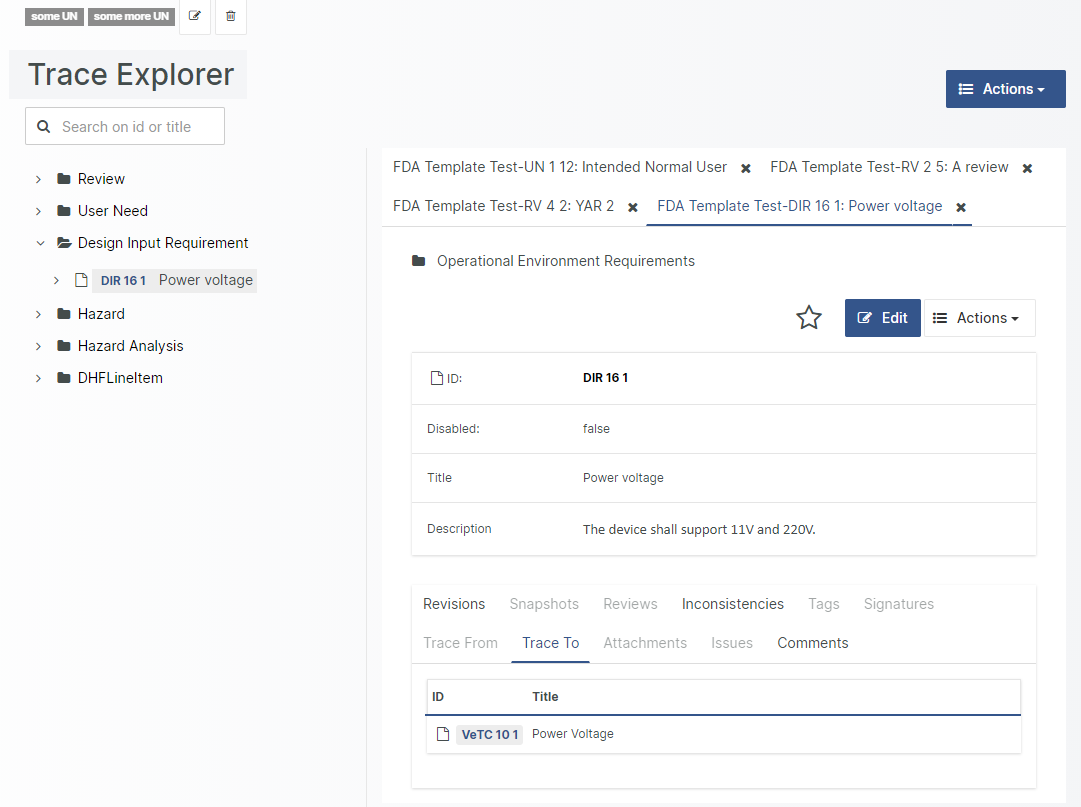
Trace Explorer
The Trace Explorer displays a tree structure containing all traced objects in the current project structure.
The Trace Explorer is divided into two areas. The left displays the trace tree. The right area is reserved for displaying Document Objects in tab mode.

Each root node in the project represents the document objects of that type that have no incoming traces. Thus, the node Requirements contains a requirement which has no incoming trace from any other project. The use cases that DO have incoming traces from requirements can be found as child nodes to the requirement section.
Use the Search box to search for IDs or words in the Document Objects title to highlight all occurrences of the Document Objects that match the search criteria.
For Suspect Traces (occurs when the parent object has been changed after it was traced to a child object), the parent object is displayed with a Suspect Trace icon, with a red stripe.

If a document object appears multiple times in the trace tree, the full sub-tree is only displayed once, and for all other occurrences, a reference node is displayed. Referenced traces are displayed with an arrow icon.
A trace between linked projects that are not of the latest revision is called an Obsolete Trace. Updating a child item in a linked trace relationship, causes this state as the trace from parent to child are per default not automatically updated. The child item is depicted with the Obsolete Trace icon in the Trace Explorer.
To select a Document Object node in the Trace Explorer, click on the node and note that the node text becomes italic and the background becomes light grey.
Note! Note that Document Objects from linked projects are displayed with their Project Name before the ID to signify that they do not belong to the master project.
Note! Traces to linked Document Objects are not automatically updated when the linked Document Object is updated (unless explicitly configured to do so). Obsolete traces; i.e., traces tracing to old revisions of Document Objects, are displayed with a warning icon.
Use the Action menu to:
Refresh the Trace Explorer to the current state
Expand and Collapse nodes
Clear the current selection
Set outgoing traces (Trace to...)
Set incoming traces (Trace from...)
Clear suspect traces (Set Un-suspect)
Trace obsolete traces to their latest revision
Suspect Traces and Clearing Suspect Traces
It is fairly obvious that modifying an existing Document Object might have an impact on objects traced to it. E.g. if making a change to a specification is likely to require an update to the associated Test Cases that test the specification accordingly.
Aligned Elements, therefore, implements something called Suspect Trace. This implies that when a Document Object that has outgoing traces is modified, the traces are marked as “Suspect” which means that they are subject to inspection to assess the impact of the change.
In Aligned Elements, this manifests in different ways:
In the Trace Explorer, the objects traced from the modified object are marked with a special icon
The modified object gets a "Suspect Trace" inconsistency
The Suspect state can be relieved/removed in the following ways:
Select the traces / Document Objects marked to have Suspect Traces in the Trace Explorer, then click Clear Suspect in the Action menu.
The Inconsistency View's Actions also contain an option for Clear Suspect
Manually remove all traces from the modified object
If so configured, update the outgoing trace objects (see below for details).
Note! The automatic clearance of the suspect trace state by updating the traced objects is configurable in the Project Settings.
Note! Both the parent and child Document Object Type must have the suspect trace validation rule configured for the suspect trace inconsistency to show up.
