# Sign Documents with Electronic Signatures
Aligned Elements supports electronic and digital signing of individual objects and documents. Signatures can be made with or without electronic certificates.
Digital signatures are triggered by a workflow action and can be applied to any document object type. However, signing a File Document Object implies that a signed PDF/A copy of the contained document is created.
## How to create a Signature Document Object
In the Aligned Elements default configuration, a signature is created when the **Validity** attribute is changed from **Draft** to **Release** for a File Document Object (for any other document object type, no PDF will be generated and no digital certificate is needed). This action creates a Signature Document Objects which is listed in:
* the Signature book found in the Project Explorer
* in the Detailed tab **Signatures** of the Document Object which is being signed
Click on the Signature Document Object **ID** to open it. The Signature Document Object contains information about:
* The Document Object to sign
* A list of users (Signees) that shall sign the Document Object
* The reason for the signature
* A Due Date defining when Signature event shall be completed
* A Status defining whether all signees have signed the Document Object
* In the case of a File Document Object, a PDF/A copy of the original document is added
Fill out all these attributes to define the scope of the Signature Event.
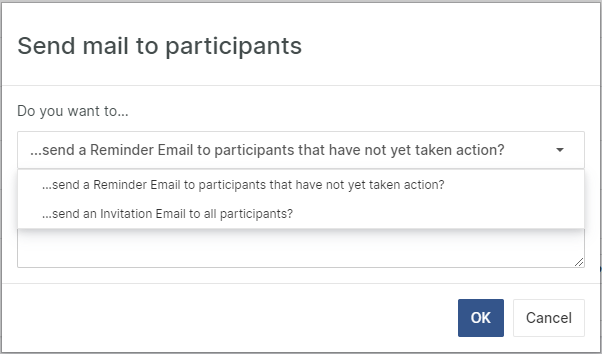
### Sending Emails to Signees
Use the **Email User(s)** in the **Action** dropdown to notify Signees about their expected participation in the Signature. You can choose to:
* Send an email to all signees that have not yet signed (e.g., a reminder email)
* Send an email to all signees (e.g., at the start)
{% hint style="info" %}
Note! Make sure the participating users have been assigned email addresses in the user management and that SMTP settings have been set up in the web.config file for the email functionality to work.
{% endhint %}
## How to Sign
Open the Signature Document Object. In the **Action** menu, select **Sign**. Authenticate with your user name and password. Fill out any additional information requested and click **OK** to confirm. If the Signature is done on a File Object, add a Signature Stamp is added to the PDF/A copy of the original document.
{% hint style="info" %}
Note! It is not necessary for a SIgnee to have Signature editing premissions in order to Sign (or Reject).
{% endhint %}
When all signatures have been collected, you can signal this by setting the status of the signature to Closed.
{% hint style="info" %}
Note! Prerequisites for a person to sign are:
1\) The person is listed in the Assigned User table
2\) All compulsory cells for the user have been filled out in the Assigned User table
3\) The Reason text box is filled out
Note that the signature is set on a specific revision of a Document Object.
Note that if an incorrect user name and password is used several times during signing, the user is locked out from the application. This threshold is configurable.
{% endhint %}
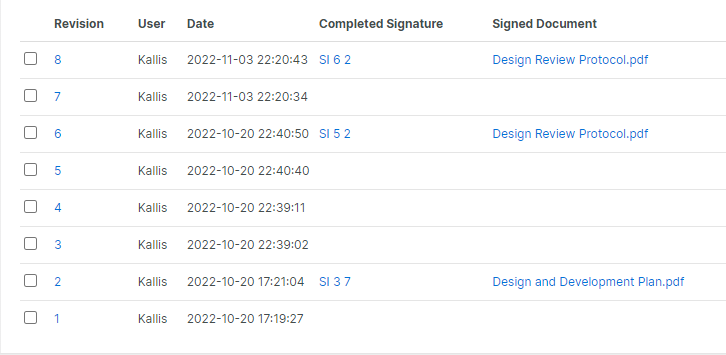
The File Object Revision Tab shows which Revisions of the File that lead to completed signatures.
Click on a Signature to navigate to the signature object.
Click on the Document File name to download the signed document.
{% hint style="info" %}
Note that **Revert to Revision** is not available for signatures in order to preserv the integrity of the signatures.
{% endhint %}
## Handling of Digital Certificates
You need to acquire a digital certificate for each user. These must be of the standard X.509 V3 Class I and can be bought from e.g.:
* SwissSign ([www.swisssign.com)\ ](http://www.swisssign.com\)\ );
* Veri Sign
* TC TrustCenter
Aligned Elements will safely store these certificates files for each user in the project database.
## Signing without digital certificates
Aligned Elements can be set up to use electronic signatures without using digital certificates.
This is accomplished by using the **NoCertificate** mode in the **Signature** Settings in the **Settings** section. Note that this approach requires the application to be validated (according to e.g. FDA CFR 21 Part 11).
## Enforcing Signature Order
There exist many configurable options to enforce the signatures to be conducted in a particular order. Contact the Aligned Elements Support team for more information on these options.