Work with Chapters
Chapters are used to organize Document Objects in a structure. A Chapter can contain Document Objects and other Chapters. When inserted into a Word Document, the chapter is converted to a heading in Word.
The Chapter path to a Document Object is displayed at the top of the Document Object Form.
Note! The type name in the Project Explorer acts as a chapter and provides the function that normal chapters have.
Note! Changes to the Chapter structure are recorded in the Project History.
How to add a Chapter
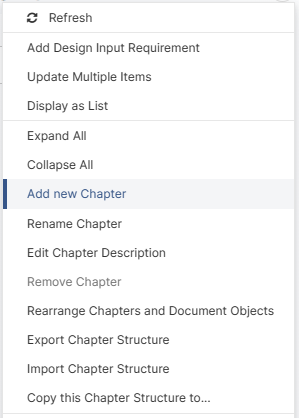
In the Chapter View, click on the ellipsis button of another Chapter or the root Chapter / Type and click Add new Chapter.

This will prompt you to add a name for the Chapter. The Chapter name cannot be empty. Click OK to create the new Chapter. The Chapter will be displayed at the bottom of the current chapter list.
How to rename a Chapter
Select an existing Chapter in the Chapter View. Use the ellipsis button to access the Rename Chapter button. You are now prompted to give the Chapter a new name. Click OK to commit the change.
How to remove a Chapter
Select an existing Chapter in the Chapter View. Use the ellipsis button to access the Remove Chapter button.
Note! The chapter (or the corresponding subchapters) cannot be removed if it/they contain one or more Document Objects.
How to move and reorder Chapters and Document Objects
In the Chapter View, use the ellipsis button in the root Chapter to click Rearrange Chapters and Document Objects. An Arrangement view will be displayed where you can use drag and drop to move and reorder Document Objects and Chapters. Click OK to commit the changes.
Chapter Descriptions
As an optional feature, it is possible to add a text (rich text) to a chapter. This text will be displayed after the chapter (if so configured) when the chapter is inserted into a Word Document.
Use the ellipsis menu to select Edit Chapter Description to access the text dialog in which to enter and modify the chapter description. If a Chapter has a chapter description, the chapter icon turns blue. It is then possible to view the chapter text by hovering with the mouse over the chapter icon.
Changes made to Chapter Descriptions are listed in the Project History.
How to Copy a Chapter Structure
If the same chapter structure should appear for several Document Object types, then the Copy Chapter Structure function can be used to copy a selected Chapter, and paste the chapter, including all its subchapters, in one or more other Document Object Type (or subchapters of the selected Document Object types).
For the chapter you intended to copy, click Copy this Chapter Structure for the chapter. In the subsequent dialog, select the target/destination Document Object Type(s) for the copy operation. Then select the target chapter(s) in the respective Document Object type name(s), in which the original chapter (and all its sub chapters), shall be replicated.
Click OK to execute and complete the operation.
Export and Import Chapter Structures
To reuse a Chapter structure in a different Project, use the Export Chapter Structure action in the Chapter View to download the structure originating from a selected Chapter as an xml file (.chs file in older versions of Aligned Elements).
This file can then be applied in the Import Chapter Structure action in a different chapter.
The Chapter description, if existing, is included in the exported chapter structure file.
