Aligned Elements Web Client User Manual
3.1.272.24402
3.1.272.24402
  • Introduction
  • Basic Concepts
  • Get Started
    • Activate your Aligned Elements Account
    • Log In
    • Open a Project
    • Change Project
    • Create a new Project
    • The Project Start Site
    • Your Assigned Items
    • Manage Your User
    • Log Out
    • Enter Design Control Items
      • Work with Chapters
      • Work with Table Attributes
      • Inserting Images in Attributes
      • Working with Traces
      • Add Issues
      • Add Attachments
      • Collaborate using Comments
      • Favourites
      • Find in... Actions
      • Inconsistencies and Positive Cues
  • Document Object Actions
    • Move and Rearrange Chapters and Document Objects
    • Update Multiple Items
    • Generate Design Control Items
    • Copy Design Control Items
    • Lock Document Objects
    • Generate Reports
    • Export Document Objects
    • Import Document Objects
    • Copy Document Objects between Projects
    • Import Files
  • Explorers and Views
    • Project Explorer
    • File Explorer
    • Trace Explorer
    • Test Run Explorer
    • Project History
    • Chapter View
    • List View
    • Search Result View
    • Export to Excel in Grids
  • Project Status
    • Display Inconsistencies
    • Display Consistency Coverage
    • Display Risk Summary
    • Display DHF Index
  • Queries
    • Run a Query
    • Design a Query
    • Query Filters
  • Charts
    • Display a Chart
    • Design a Chart
  • Trace Tables
    • Run a Trace Table
    • Design a Trace Table
  • Work with Documents
    • Adding Word Document to File Objects
    • The Word Add-in. Adding Design Control Items to Documents
    • Sign Documents with Electronic Signatures
    • Save Files to Disk
    • Released Document View
  • Design Reviews
    • Conduct a Design Review
  • Risk Analysis
    • Perform a FMEA Risk Assessment
    • Perform a Preliminary Hazard Analysis
    • Relative vs. Absolute Mitigations
    • Potential Hazard
    • Using the Risk Analysis to assess the Software Safety Classification
  • Manage Tests
    • Test Runs
      • Planning a Test Run
        • The Burndown Chart
      • Executing a Test Run
      • Completing a Test Run
      • Test Run Functions
      • Test Runs and Linked Projects
      • Caching of Test Runs and Test Run Explorer
    • Classic Tests
  • Work with Tags
    • Add Tags
    • Filter views on Tags
    • Edit Tags
    • Tags and Snapshots
  • Assistants
    • Run an Assistant
  • Snapshots
    • Create a Snapshot
    • Display a Snapshot
    • Compare Snapshots
  • Settings
    • Project Information
    • Manage Users
    • Manage User Groups
    • Project Settings
    • Project Hierarchy
      • Branch Projects
      • Merge Projects
    • Unlock Objects
  • Dashboards
    • Select a Dashboard
    • Create a Dashboard
    • Remove a Dashboard
  • AI Features
    • AI Features in Aligned Elements
  • Aligned Elements Automation Tool
    • The Automation Tool
  • Web Administrator Tools
    • Manage Projects
    • Rename, Copy or Remove Project
    • Manage Users
    • Manage Permissions
    • Register a new Administrator
    • Inspect User Logs
    • Manage Templates
    • Download Log Files
  • Manage Service Configuration
  • Configure a Type Name Change
Powered by GitBook
On this page
  1. Get Started

Create a new Project

PreviousChange ProjectNextThe Project Start Site

Last updated 11 days ago

To create a new Project, select the option Create a new Project in the Open Project view once the log in is completed.

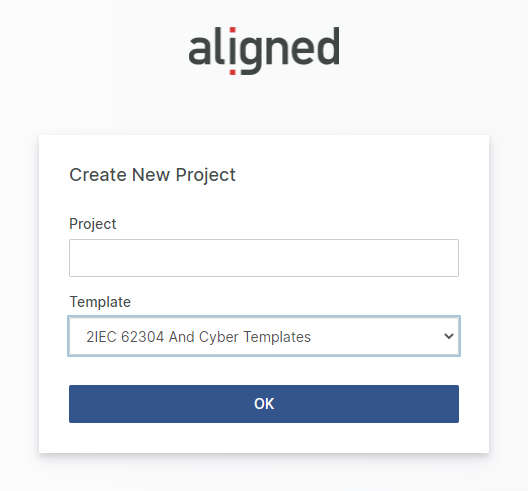
Enter a Project name and select the Template set that should be used for the Project. Click OK to create and load the new project. (To cancel, navigate backward in the browser).

Note! To create a project, your User needs to be a !

Note! The templates available are determined by the Company name assigned to the current user and corresponds to the company name defined in the web-configuration for elementServerTemplate.

Note! A Project name may not contain hyphens or start or end with white spaces.

Automating Project Preparations

To run prepared scripts using the Automation Tool at project creation, the server needs to have the tool installed and have a reference to the tool listed in the web-configuration as the example below shows:

<elementAutomationScripts>
    <automationScripts>
      <add key="1" name="Test configuration" exePath="C:\Program Files (x86)\Aligned AG\Elements Automation Tool\Elements.AutomationToolConsole.exe" scriptPathForAutomationTool="<path to script>" arguments="{project}{server}" company="<your company>"/>
    </automationScripts>
  </elementAutomationScripts>

Note! If 'scriptPathForAutomationTool' is set, the executable is automatically started passing all available arguments for the Elements Automation Tool to run the script.

If arguments are set, the executable is started with these where {project} and/or {server} is replaced with the current values prior to passing the arguments to the executable. In this case, the executable can also be a 3rd party tool.

Projects are often prepared with standard customer specific data that is outside of the scope of the project templates. E.g., default chapter structures, list of users, project settings, or default dashboards. As an option to manually perform the creation of such content, this can be prepared using the Aligned Elements Automation Tool (see for details).

The Automation Tool
Web Admin