
The Word Add-in. Adding Design Control Items to Documents
Aligned Elements can insert information such as Document Objects, Trace Tables, Queries, Charts, and many other things in Word Documents using the Aligned Elements Word Add-In.
Opening a Word Document and connecting via the Word Add-in
Two alternative paths are supported to fill Word documents with design items. Either from the Aligned Elements Web Client or direct from the Aligned Elements Word Add-In.
Edit a Word Document from the Web Client
Open a File document object for edit from the Web Client, then click on the Edit File button for the embedded File:

The file will be downloaded and you can open it directly from the bottom of your browser window.
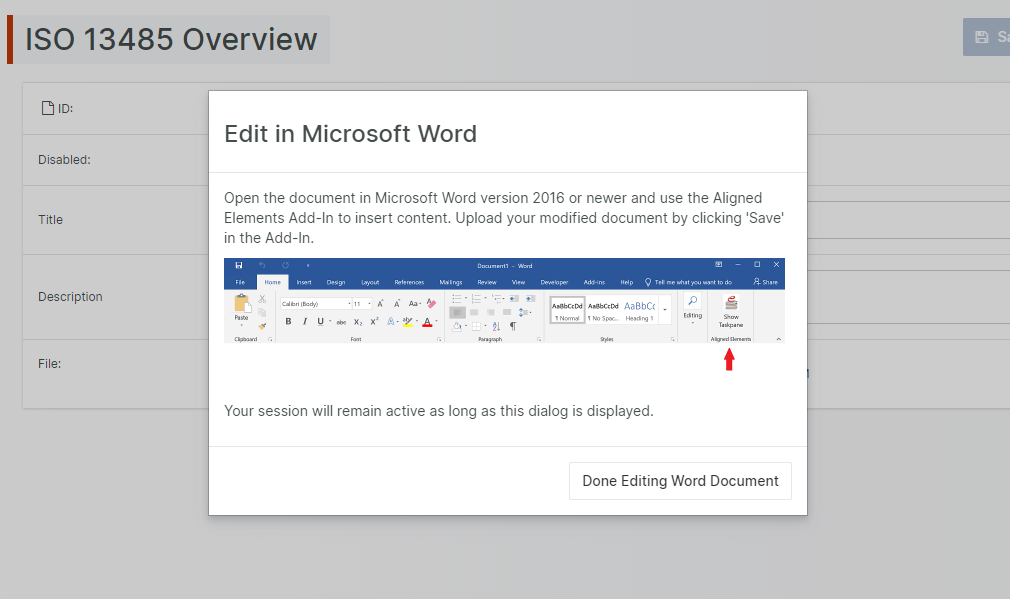
The document will be opened directly in Microsoft Word and the Aligned Elements Add-in will display the Word Explorer automatically:
You can now edit the Word Document as normal. To add Aligned Elements content, use the functions from the add-in as described below.
Saving a Word Document
When finished editing, click the Save button in the Aligned Elements Word Add-In. This will save and upload the edited file to the Aligned Elements Web Client. Close Word to finish the session.
Note! When closing Word, a "Want to save your changes?" message will be displayed by Word. This message can be ignored since the document has already saved and uploaded to Aligned Elements.
Return to the Aligned Elements Web Client and save the File Object by clicking the Save button in the Document Object form.
Note! When saving the File Object, any Document Fields (such as Aligned Version fields in the Word Document) are automatically updated.
Inserting Document Objects into a Microsoft Word Document
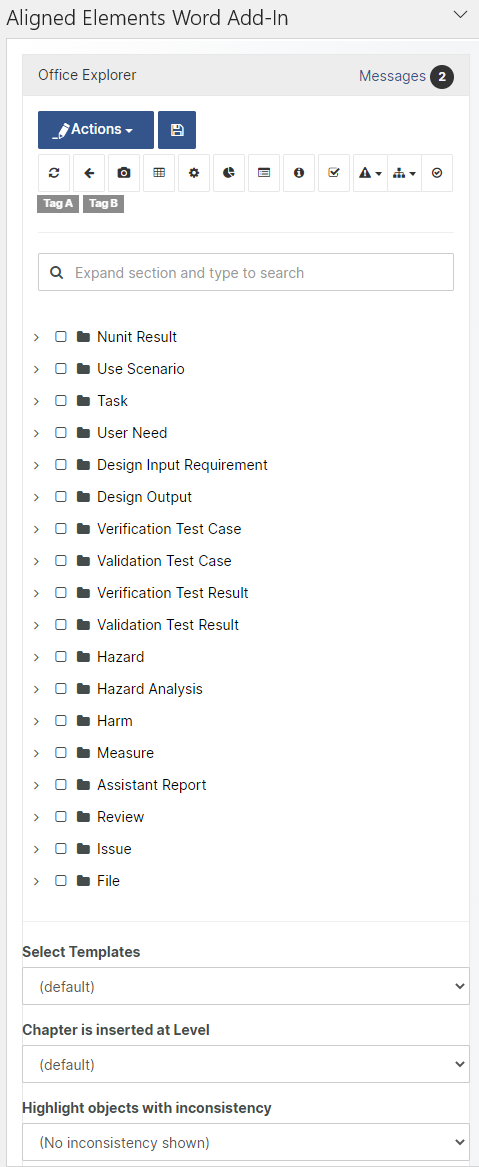
In order to insert and display a Document Object into your word document, open a Document in the Document Editor and select the objects in the Office Explorer tree view. Set the cursor in a location in the Document and click Insert Objects in the Action dropdown. This will insert the Document Objects in the desired location.
Note! Each document object can only be added once to the document. However, it is possible to make a document object part of multiple documents.
Remove Document Objects from a Word Document
Select a range in the document that includes the Document Objects o remove. Click Remove Objects in the Action dropdown in the Office Explorer. This will remove the Document Objects from the Document.
This removes the document object from your Microsoft Word Document; but does not disable the object in the Aligned Elements database.
Searching and Finding Object in the Document object tree
To find a particular item, expand a section of the Document object tree and type in a search word in the search bar. The search looks for matches of the ID or words in the title. The search will automatically filter all objects that match the search criteria.
Synchronize Document with Database
The Aligned Elements Word synchronization mechanism is bi-directional.
When you click the Synchronize button in the Word Add-In toolbar, the entire word document is scanned to detect deviations between the object displayed in the word document and the status of the same object in the database.
This means that the document objects stored in the Aligned database are updated with the changes you have made to the objects in the word document when you click the Synchronize button. You will be prompted with a normal Gap Form dialog before you commit your changes to the database.
However, the bi-directional mechanism also implies that the document objects displayed in your Word document are updated with changes in the database made by yourself or other users if you have not made any changes to the objects in your word document (automatic update).
This action can also be performed on selected document objects using the Action dropdown menu in the Word Project Explorer.
Note! When you open a word document from a File Object containing document objects, the objects are not automatically synchronized as the word document is displayed. You have to explicitly click the Synchronize button to update the document objects in the word document to the latest revision.
Synchronizing Chapters
Aligned Elements also synchronizes chapters. This affects the name of the chapters as well as their contents.
Chapter names that are changed in the database are updated in the document during synchronization and vice versa. When synchronizing chapters, Aligned Elements also checks if all Document Objects in a chapter are already part of the document. If they are not, the Document Objects are automatically added to the document.
The position of the added Document Objects in the Word document is based on the display order in the Project Explorer and is determined in the following way:
First, the Document Object preceding (in the Project Explorer) the object to be inserted is located in the Word document.
The Document Object to be inserted is inserted after the located Document Object.
If the preceding Document Object cannot be located in the document, the object is inserted directly after the chapter, before any other Document Object.
Conflicts at synchronization
When working with document objects in a Microsoft Word document, the following situation can occur; the same document object was changed by another user in the database.
As a result, the document object was changed in both places.
Should the case arise where an object has been changed in the document AS WELL AS in the database, the system will prompt you to choose which of the versions of the document should overwrite the other.
By choosing the current version from the database, the changes made to the object in the document are overwritten with the current version of the object from the database.
When choosing to overwrite the changes in the database with the changes made to the object in the word document, the document object is updated in the database to a new revision.
Each time a document object is updated in the database, the gap dialog appears as usual.
If you Cancel in a conflict situation, the object is not “synchronized”, i.e. the decision in how to resolve the conflict is postponed until the next synchronization.
Note! If you cancel the changes are NOT reverted and stored in the word document if you save the document. The next time you open the word document the changes are still there. If you wish to revert to the original version of the document object, delete it from the word document it and insert it at the same place again.
Changes in the document outside of document tags are of course not written to the database and are only part of the document. These changes are saved as you save the document.
Update Document with Database
This option is intended to align the document content with the current state of the objects in the database. Even if objects are not changed in the database, they are still updated in the word, overwriting any changes. This can, for example, be used to update the document with a new definition of the word template for the objects. This can either originate from a new definition of the word template or by choosing a different template variant.
This action can also be performed on selected document objects using Action dropdown in the Word Project Explorer.
Note! Any unsaved changes made to document objects in the document are ignored. The object content is replaced with the content from the database.
Note! Document Objects already having the most current revision in the document are also replaced. This allows you to update all objects to a different template.
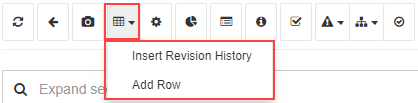
Insert an automatic Revision History
The Aligned Elements Word Integration features an automated revision history recording. To insert a change history table into the document at the cursor location, click the Insert Revision History dropdown item in the Revision History button in the Word Add-In toolbar. The system now inserts a revision history where the first row is populated with a document version number, the user name of the current user and a current date.
From now on, the following changes are automatically recorded in the revision history.
Changes to any fields of document objects in the document.
Inserting of document objects into the document from the project explorer
Deleting of document objects from the document.
The revision history and synchronization
When the word document is updated with newer revisions from the database (during the synchronization) the change comments entered when creating these revisions are transferred to the change column in the revision history.
Since the recording granularity of the revision history is very fine grained, your revision history will quickly become very extensive. It might therefore make sense to place it at the end of the word document rather than at the beginning.
The Versions in the Revision History
The initial version number in the automated revision history is defined in the RevisionHistory.docx word template. Per default, this is 0.1 (but it could also be a whole number, such as 1). All changes performed in a single session are recorded under the same version number. When opening the document the next time, the previous version number is incremented by 1 i.e. from 0.1 to 0.2 if the first number is 0.1 or from 1 to 2 if the first number is 1.
Note! In the case of the version being a decimal number. the version after 0.9 will be 0.10 and not 1.0
The version number can be manually edited. If at a certain time you choose to upgrade your version number to 1.0 just edit the version number. From now on, the system will start incrementing from 1.0, i.e. the next version number will be 1.1.
Manually Add a Row to the Revision History
Click Add Row in the Revision History dropdown in the tool bar to manually insert a new row into the Revision History.
Insert Document Objects at User Defined Level
By default, Aligned Elements maps its internal Chapter levels to Word headings when inserting chapters and objects into Word i.e. inserting a book will map to a word heading of level 1, using its existing Word chapter templates accordingly.
It is however possible to customize this behaviour and map the inserted chapter to a user-defined heading level. To perform this, set the Chapter is inserted at Level in the Office Explorer before inserting the Document Objects.

All subchapters will be inserted on Word heading levels relative to the top chapter heading.
Insert Old Revisions
To insert old revisions of Document Objects at the cursor location, select the Document Objects in the selection tree, click Insert Old Revision in the Action dropdown. Then pick one or more revisions for each Document Object in the revision list to insert them.
Insert Snapshot
When inserting document objects from a snapshot, the system will prompt you to select an existing snapshot. After this, the system will enter all Document Objects which are part of the snapshot into the document. The first object is inserted at the current position of the cursor. The fields of these document objects cannot be edited in the document.
To insert a Snapshot, place the cursor somewhere in the document and select the Snapshot icon from the Word Add-in toolbar. Select a Snapshot in the selection dialog and click OK to insert the snapshot content.
Insert Query
When inserting objects from a query, the system will prompt you to select:
an existing query.
the depiction type After one of the queries is selected, the following prompt appears.
To insert a query, place the cursor somewhere in the document and click the Insert Query button in the Word Add-In toolbar.
Select the query to insert in the selection dialog and click OK. In the following dialog, select the depiction type.
Query Depiction Types
It is either possible to simply insert all objects from the query into the document or create a list of them.
Insert objects from a query as a Table
When inserting objects from a query as a list, the objects are listed in a table. The appearance of the table is determined by a word template for query tables.
Inserting objects from a query as individual Document Objects
When choosing to insert them as individual document objects they are inserted as document objects as usual and will be synchronized together with the query. The included document objects cannot be manually edited in the Word document.
Inserting objects from a query as Chapters and Document Objects (Remove Chapters)
When choosing to insert the set as chapters and document objects, all chapters are included for the Document Object Type but only the Document Objects that matched the query. When the document is synchronized, the content of the query is updated. The included document objects cannot be manually edited in the Word document.
You can optionally choose to not display empty chapters. Parent chapters are however still displayed even if they don’t contain any Document Objects of their own.
Insert Chart
This inserts a selected chart. All charts are listed for selection. To insert a Chart, select the Insert Chart button in the Word Add-In toolbar.
Select a Chart from the selection dialog and click OK.
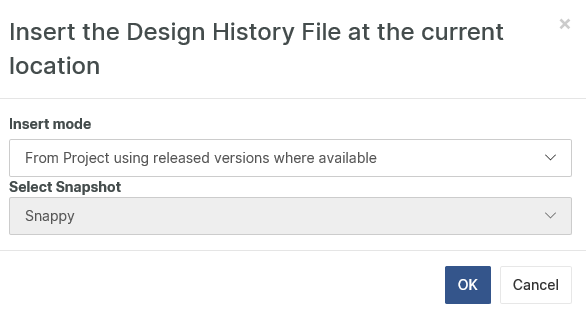
Insert DHF Index
To insert the DHF Index at the cursor location, click the Insert DHF Index button in the Word Add-In toolbar.
Select which mode of the DHF Index you want to insert.
The first option will insert the DHF Index in its current state.
The second option displays the most recent release version of Documents which primarily makes sense when using e-signed documents in the DHF Index.
The third option is similar to the second but also shows all revisions of the Document that have been released as opposed to the most recently released revision.
A fully released document means that the document has a completed signature object with the sign status set to “closed”.
If such documents exist in your project history, that revision of the document will be displayed.
The fourth option is to insert the DHF Index from a snapshot.
Insert Project Information
This inserts the project information for the current state of the project or for a snapshot. To insert Project Information at the cursor location, click the Insert Project Information button in the Word Add-In toolbar.
Insert Test Runs
To insert a Test Run at the cursor location, click the Insert Test Run in the Word Add-In toolbar.
Then select a Test Run from the selection list and click OK.
Insert Risk Summary
The Risk Summary can be inserted into a Word document by selecting a Risk Summary from the Risk Summary dropdown in the Word Add-In toolbar.
Select if you want to insert a Risk Summary with mitigations/measures considered or not. When inserting the Risk Summary, select if the input set should be all Document Objects of the risk type or from a query.
Insert Trace Tables
To create a trace table in your document at the cursor location, select the Insert Trace Table < name of the trace table> from the Trace Table dropdown button in the Word Add-In toolbar.
The trace table is created according to the available template. The created table should not be manually edited since it is automatically synchronized according to the traces in the project database.
Now you choose if you want to Insert mode for the trace table as either:
all objects of a given Document Object type from the database (From Database)
the objects in the output set for a given Query (From Query)
all objects residing in this Word document (From Document)

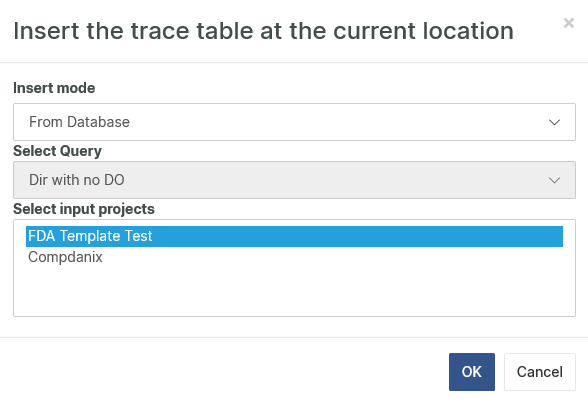
If a linked project structure is used, you can also select the projects from which the input should be collected.
Highlight Inconsistencies
It is possible to highlight inconsistent items in a document by clicking on the button below.
The inconsistencies to show are selected with the dropdown depicted below.

Use Word Template Variants
It has been recognized that not all stakeholders are interested in the same Document Object data from Aligned Elements. To accommodate this, you can have several Word templates for a single type name e.g. one requirement word template for formal output and a different requirement template for informal output.
Defining a Word template variant is done by adding a prefix to the template name; i.e.' if we want to create variants for that which we define as “RnDStyle” in the main set, a template might be called “RnDStyle.Requirement.docx”.
All Word templates prefixed with “RnDStyle” are perceived as belonging to the same variant set. If a variant does not define a specific template, the template without a prefix is used. To select which variant style to apply, use the Template Set dropdown in the Office Explorer before inserting objects.
Note that the Word Documents are synchronized using the currently selected template set.
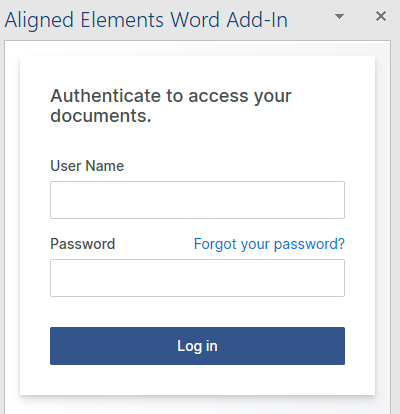
Edit a File directly from the Add-In
Alternatively, a File Document Object can be selected and edited directly from Microsoft Word without starting the Aligned Elements Web Client first.
Start by opening Microsoft Word and click on the Aligned Elements Add-In. You will be prompted to log in:
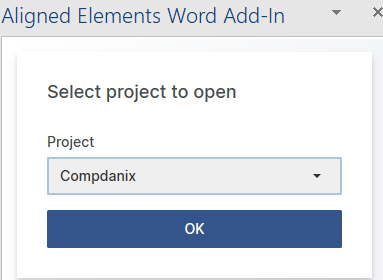
Followed by selecting a project:
The File Explorer will list all available File Document Objects. Double-click on a file to start editing:
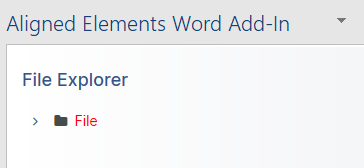
The Office Explorer will load and you may use the functions from the add-in as described below.