Manage Users
In Aligned Elements, each project hosts its own set of Users. In the User Management, users with User Management rights can create and manage User. Any User action that changes project data is stored in the Project History.
Note! Once a User is created, it can not be renamed or removed since this would jeopardize the integrity of the Audit Trail. However, the User has a Full Name that can be modified at any time. Furthermore, a User can be disabled which means that it can no longer access Aligned Elements.
Web User vs. Project User
To access any Project via the web-client application, Aligned Elements use an additional authentication layer to grant access to the web-client application. This access also provides a single point of authentication for any project; i.e., a Web user can log in to the web-application using his/her credentials (i.e., web user name and password) and load any project where he/she has access. The Web user name has to be identical to the user name listed in the user management for any project but the password may be different.
The Project user can only be used to access the Project directly via the windows-client for Aligned Elements.
Note! All user registration and project assignment is possible to manage centrally from the 'Manage Users' view if your user is assigned Web-admin rights. (see Manage Users below).
How to Manage Project Users
In the Navigation Bar, select Settings => Manage Users, to access the User Management view. Here you may add, modify and disable users.
A user must belong to at least one User Group. A User Group defines the permissions/rights with regard to the available document object types.
When a new user is added for the first time to the web-application, a Web user is automatically created and the user will be sent an email to confirm his/her email address and to set an initial password. If no email address was entered, then the user has to be manually informed to register (see Log In) his email address. The project user, which is only directly accessible from the windows-client, will receive an initial default password that is the same as the user name and has to be changed after the first login.
A user that attempts to log in with incorrect credentials more than three times in a row, is automatically locked out. A locked out user can try logging in again after 5 minutes.
If a user has forgotten their password and has confirmed his/her e-mail address at a prior time, clicking on Forgot your password will mail a link to set a new password to the confirmed address.
New users are optionally notified via email about having received a user in a project (provided that Email settings have been set up).
How to add a new Project User
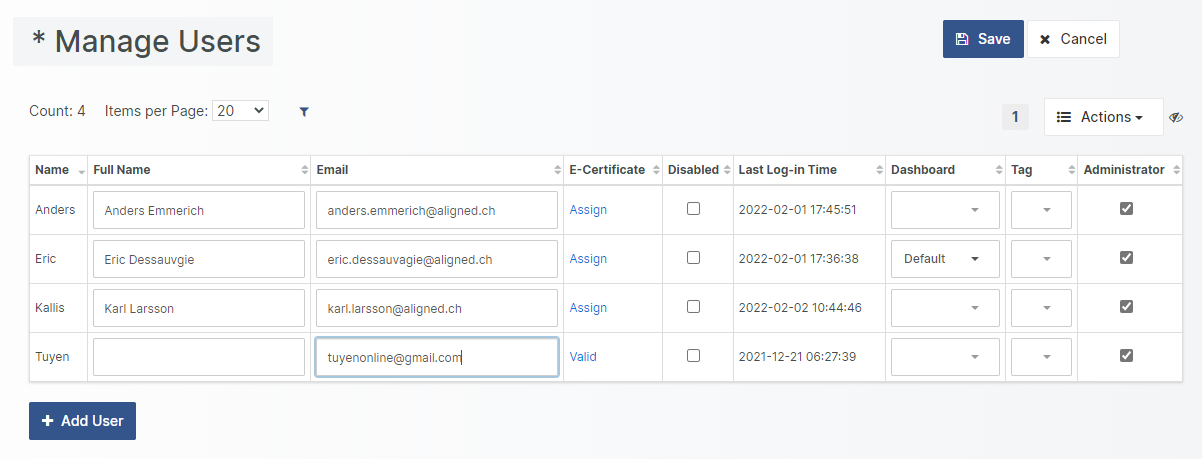
Click on the Add Users button to create a new row for a User. Either select a known listed user or click cancel to manually add the applicable data in the respective cells.

User Name
This is the name of the User. The User Name is used for authentication and is also listed in the Project History in association with all data integrity relevant actions the user performs in Aligned Elements.
If the organization is using Active Directory or LDAP, it is recommended to use the user's existing Windows user name as Aligned Elements user name. It is also possible to directly integrate with a local Active Directory and perform user credential validation via Active Directory.
Note! The User name cannot be modified once it has been saved.
Note! The User name must be unique within the Project i.e. there must no other User with the same User Name or Full Name as the new User's User Name.
Full Name
The Full Name represents the normal name of the user (first name and last name). Even though it is not mandatory, it is good practice to fill in the User's Full Name.
Note! The Full name must be unique within the Project; i.e., there must no other User with the same User Name or Full Name as the new User's Full name.
Email
The Email address is used when Aligned Elements sends emails when; e.g., when getting invited or reminded about participation in a Signature or Review, when an email is sent out as part of a workflow, or when changes occur to a Favourite Document Object to which the user has signed up to be notified when changed.
Note! Emails can only be sent by Aligned Elements when the email smtp settings have been set up properly.
E-Certificate
The E-Certificate option is necessary when the user wants to sign files/documents electronically using a digital certificate.
Disabled
In Aligned Elements, a user cannot be deleted or removed. However, disabling a user prevents him/her to access the system. A user is disabled, either explicitly by another user (ticking the Disabled box and save), or automatically when having tried to sign in using incorrect credentials more than three times.
Note! A User can not disable himself or reset his own password.
Last Log-in Time
This reports the last known login time for the user.
Dashboard
With this option, a user manager can select a default Dashboard to be displayed to the user when he opens the project. If selected, that user cannot select any other Dashboard.
Tag
If an existing Tag has been selected with this option, the user in question will only be able to access objects within that Tag. Document Objects created by that user will automatically be added to the Tag.
User Groups
A user must belong to one or more User Groups. The aggregated rights when belonging to several User Groups are the combined positive rights.
When completed, click Save to save the changes. Alternative click Cancel to cancel the action.
How to assign Electronic Certificates to a User
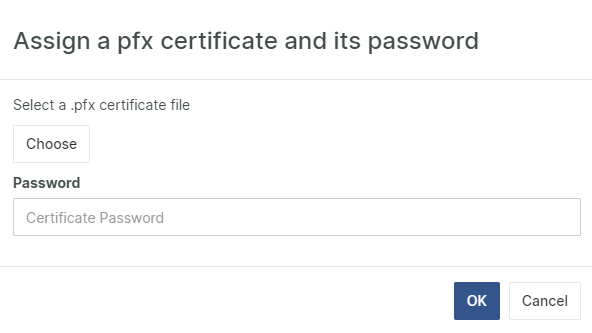
The Column E-certificate provides the possibility to add a certificate (for digital signatures). Click the Assign link to upload the user’s electronic certificate.

In conjunction with uploading the certificate, the password of the certificate has to be added. If the certificate and password are valid, the Assign link will change to Valid. If the certificate should expire, the Valid link is changed to Invalid.
Information from the certificate will be used when applying Electronic Signatures to PDF documents.
How to Manage Web-Client Application Users and Roles
As described above, the Web user is authenticated in a separate layer to the Project user. The Web user can be associated with the optional Admin role which enables the user to manage other Web users and create projects directly from the Web-client application.
The additional actions are listed in the Select Project View if your current user has the Admin role.
Manage Web Users
An Admin may 'Register New User' or edit an existing user where the user can be enabled/disabled and the email address may be corrected. It is also possible to initiate a resend of the confirmation email for a user from the 'Manage Users' view. Additionally, the view presents a summary of which projects the user is assigned. This additional project specific information is possible to hide using the action 'Show/Hide Project Information'.

Note! Only users assigned to the Web Admin role have access to this view.
Register New User
To register a new user, click on the <Register New User> button and fill out the presented form:
When a user has been registered, the user will appear at the start and in bold in the Manager Users List.
Assign Project(s)
To assign one or more projects to an existing user, click on the <Edit> button for the user row and select the applicable project(s) in the selection list. Click the <Save> button to proceed with assigning one User Group for each project.
Edit User Data
To edit any data for a user, click on the <Edit> button, perform your modifications and click <Save> to store the changes. Click on the Link 'Resend' for the applicable user.
Resend Mail to complete Email address Confirmation
If you need to, resend the mail used to confirm any user's email address.
Note! The system needs to be properly configured to send emails.
Inspect User Log
All relevant actions performed on a web user are captured and can be inspected in the user audit log. Actions recorded are:
User Registered / Failing to register
Confirmed Email / Failing to confirm
Changed Password
User updated
User Disabled/Enabled
User Lockout
User Lockout and Disable
Failed to Sign
Update External Login provider
Note! To assign one or more users to the Admin role, please contact [email protected].
Using Windows password as alternative login for the Windows-client
From the windows-client, It is possible to alternatively use your windows password for login. This can be especially useful if you are simultaneously active in a large number of projects and are forced to keep track of many different passwords. To enable the Windows login the following conditions needs to be satisfied:
The Aligned Elements user name needs to be identical to the Windows user name.
The project setting Allow Windows Logon needs to be activated.
The Aligned Elements user needs to define the Windows Domain in which the windows user is active (if any). This is done in the User Management View.
Note! Not applicable to the web-client application!
Copy Users to other Projects
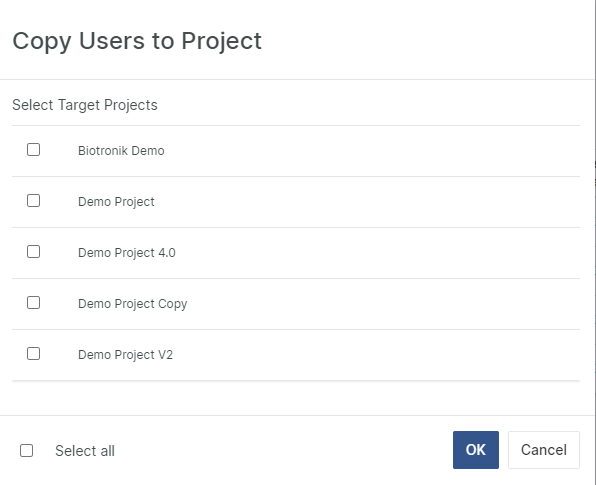
To copy users to a different project, click the Copy to Projects button. Select the Users to copy in the leftmost Copy column and optionally tick the Overwrite existing Users checkbox above the table. Once one or more Users have been selected, click Save and select the Target Projects in the displayed dialog.

Click OK to start the operation.
If the User does not exist in the target project(s), a new User with the corresponding user data is created. For this new user, the default password will be the same as the user name.
If a User with the same name as the copied user exists in the target project(s), the Full name, Email, Windows domain, and user groups (provided that they exist) are copied to the user in the target project.
Disabled users cannot be copied.
Passwords are never copied. Password reset does not apply to copied users that exist in the target project.
If a user group associated with the copied user exists by name in the target project(s), the user will be automatically be associated with that user group.
If a user group associated with the copied user does not exist by name in the target project(s), that user group association will not be recreated in the target project.
For existing users, all user groups are removed from the existing user in the target project and the user groups defined in source user are added to the user if they exist in the target project. If this results in the user having no user groups, then the copy action for that particular user is skipped in its entirety for the given target project.
Note! If no user groups can be associated with the copied user in the target project(s), the user will not be created in the target project(s).
Export Users
It is possible to export the user information to a file. In the User Management click Export Users and select which users you want to export by ticking the checkboxes in the left-most Export column. Click Save to complete. A file with the name Users@<projectname>.urs is created containing the user information. This file can later be imported into different projects.
Note! Passwords, user certificates, certificate passwords (for electronic signatures), and Proxy Users (users for integrated external issue tracking systems such as Trac and TFS) are not exported.
Import Users
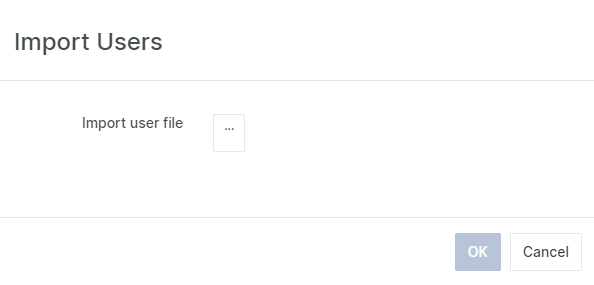
To import users, in the User Management click Import Users and select a valid .urs file.

Select the users listed in the file, that you want to import. The Import Form displays if a user with the same user name already exists. Importing the user results in overwriting the current data with the data in the file.
If user group's and user associated with the user group's should be imported, then it is important to first import the user groups.
The initial password for a created imported user is set the user name (just like when you create a user) and has to be changed at first login.
If a user group associated with the imported user does not exist in the target project, that user group association is deleted after import.
If no user group associated with the imported user exists, then the import will fail and generate an error message.
If a user group associated with the imported user exists in the target project, the user will automatically be associated with that user group.
For existing users, all user groups are removed from the existing user in the target project and the user groups defined in the import file are added to the user. If this results in the user having no user groups, then the import action for that particular user is skipped in its entirety.
