Manage Users
The 'Manage Users' allows a web-admin to perform most user management activities.
In the Manage Users view, a Web-admin may edit a few properties for a user such as Full Name, Email, Disabled, License (optional, only visible if multiple licenses exists) and Project.
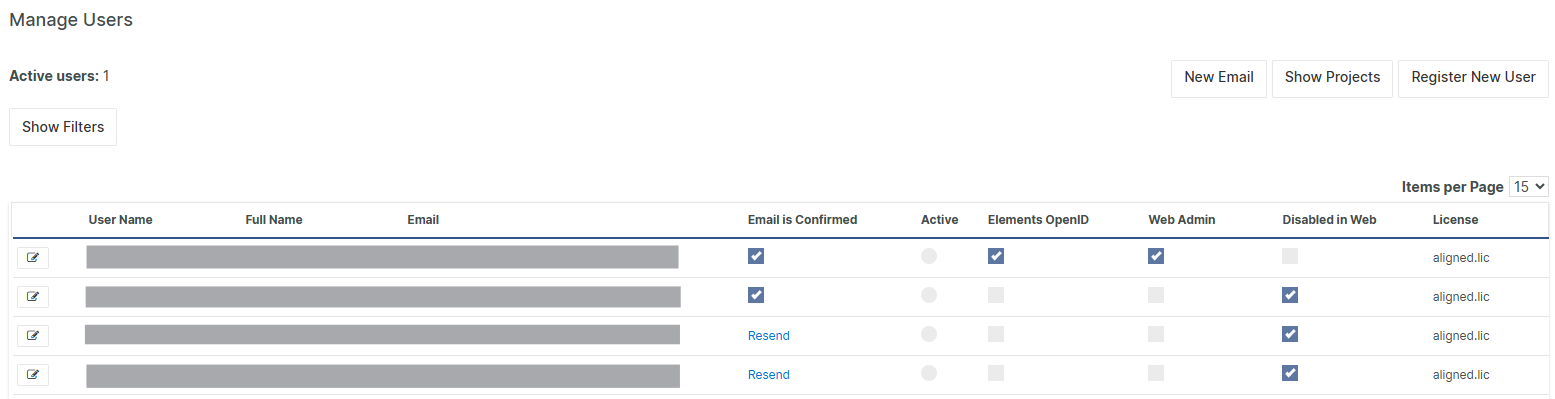
If a user has not yet completed the activation of his/her user account, it is also possible to trigger a Resend of the confirmation email from the view by clicking Resend in the Email is Confirmed column.
All modifications to a user will be logged in the User Audit Log.
The checkbox in the column Active is checked if the user currently has an ongoing web-session. The total number of active users are displayed above the table.
To make a user Web Administrator, edit the role 'Web Admin' property, see Manage User Roles.
The column Disabled in Web indicates whether a user can log in to the application at all.
The license column is displayed when the organisation has several different types of aligned licenses (floating, names, review etc.) and indicates which license is applied to the user.
Register New User
Clicking on Register New User will display a form to let you enter the user information.
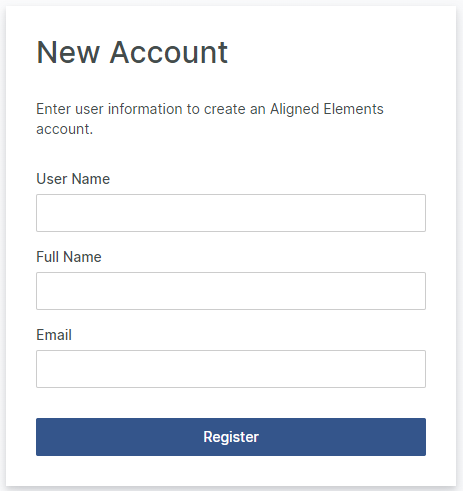
After clicking Register, the user is registered in the system and an Activation Email is automatically sent to the user.
The user will appear in the Manage User view on top of the list. You may continue by assigning projects (see below).
Activation of User Account
The user can use the Activation Email to activate their user account in Aligned Elements.
The User Account will have the Email is Confirmed flag set to Resend until the user has activated his/her account as instructed in the Activation Email.

The Administrator can resend the email to the user by clicking the Resend link in the Email is Confirmed column, should the user not be able to find the email or if the activation email has expired.
Once the Activation has been completed by the user, the Email is Confirmed value will change from Resend to a checked Checkbox, indicating that the User has now completed the activation and has set his/her individual password.

Register New Active Directory User (optional)
For systems which have access to a local Active Directory and a dedicated AD group configured, it is also possible to assign any user from the AD as an Aligned Elements user. Clicking on the button will display a form which allows you to select any existing AD user which is not yet already registered with the application. Active Directory users may only user their AD-password for authentication.
After the user is registered, it will appear in Bold in the Manage User view on top of the list. You may continue by Assigning projects.
The column Active Directory User will be visible if the system is configured in this way, you may inspect which user is using AD for authentication.
If a user has authenticated using Active Directory at any point in time, that user will always need to authenticate using this method.
Edit a User
To edit a user, click on the Edit button on the applicable row. Save or discard your changes afterwards.
Editing the Email Address
If the email-address is modified, a new confirmation mail is automatically sent from the system to confirm the new address.
Enabling or Disabling a User
If a user no longer should receive access to the system, you may disable that user. This will block any access. In the same manner, if a disabled user need access again, just enable the user again.
Assign Certificate
Use this function to assign electronic certificates (for signatures) to a User. The assigned certificate will be propagated to all projects the user belongs to. Details on how to assign a certificate is similar to the Manage User function in the Project's Manage User setting.
Assigning a License
If a system has more than one license available, the license for an individual user may be assigned. Select one of the available licenses to assign. Node-locked licenses can only be assigned to one single user. Floating licenses may be assigned to multiple users.
To move a Node Locked license from one user to another, contact [email protected] for assistance.
Assigning Projects
It is possible to assign a user to one or more projects directly from the Manage Users view. When assigning a project, an additional selection dialogue will appear to set the user group in the assigned project. If a project is unassigned, the user will be disabled for that particular project.
Working with SSO
If SSO has been configured for the Aligned server, each log-in provider is listed as a separate column in the Users grid. A checkbox indicates whether the user has completed the registration necessary to connect the external log provider with Aligned Elements.
Show Project Information
Clicking on Show Project Information to view to list project specific data such as Disabled in Project, Default Dashboard, Restricted by Tag or User Group assignment for each user. This is the user management data for the individual project (see Manage Users) and cannot be modified from the current view. To access the user management for an individual project, click on the Project Name when Show Project Information is enabled. This will open a new tab for the project specific User Management.
Note! your current user need to have access to the project and User management rights in the project.
To hide the Project Information, click on the Hide Project Information.
Filter Users
You can refine the user list by applying various filters, such as name, project, or email confirmation status.
Click Show Filters to view available filtering options.
Select and set your desired criteria.
Click Apply Filters to update the user list.
Filters operate using an AND condition, meaning a user must meet all selected criteria to appear in the results. Filters remain active until you clear or modify them.

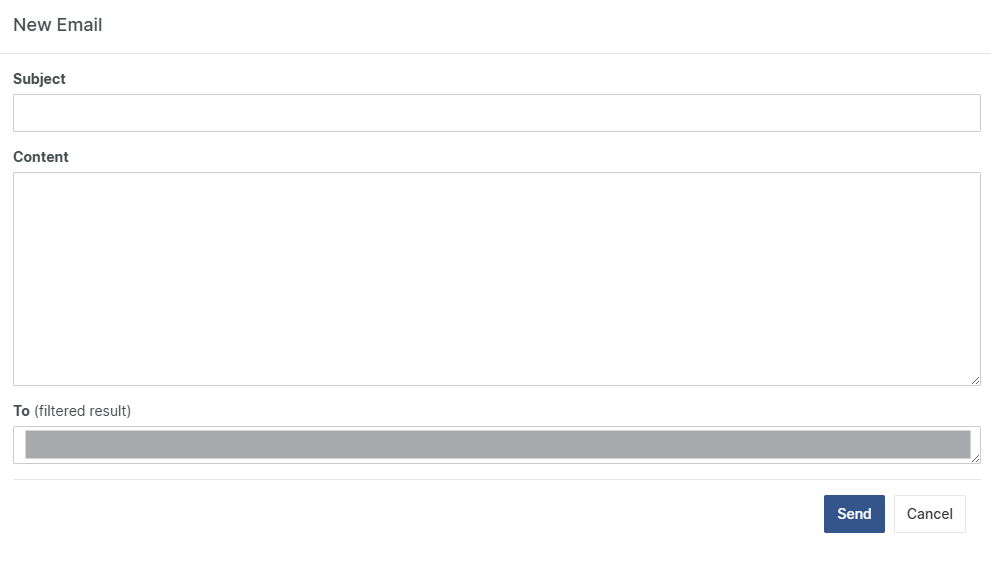
Send Email
You can send emails to users directly from the application.
Click New Email to compose a message.
Enter a subject and write your email content (note: formatting options are not available).
The email will be sent to the currently filtered list of users. Ensure your filters are set correctly before sending.
The recipients are added to the "To" field, meaning they will be able to see each other's email addresses.